Not wanting to miss the cryptocurrency fad, I desired to mine a few of my own. Scrypt-based crypto-coins, like Litecoin are (currently) best mined with ~ATI~ AMD GPU. So I got myself a second-hand HD7950 and decided to use it only for mining, while relying on the HD4000 GPU ( integrated in my core-i7 processor ) for desktop and not-too-intensive gaming
gaming.
This tutorial/rant won’t go into much detail about the mining part, and miner configuration. This is already well explained everywhere else on the internet.
Braindead customer (Windows user)
Setting it all up under Windows was pretty straigthforward:
Install cgminer and point it to your favorite pool
(optional) Overclock the board with OverDrive
Get dem coins, while playing heartstone without issue
This was fine, but not very satisfying. On to the real men world.
Proprietary driver hell
The previous method was more of a proof of concept. I want the same setup to run under Debian/Sid so I can be all nice and cozy.
The install procedure still kinda works, except you have of course to download linux-64b versions of the driver installer. I used the 14.4 version, which seemed to support Sid’s kernel (not anymore: 3.13 only… sigh ).
I configure my desktop manager to run a “dual seat” configuration like so:
Seat0 corresponds to the integrated HD4000 and Seat1 the 7950.
You can see it starts two different Xorg processes with two different configuration files which are:
xorg.0.conf:
xorg.1.conf:
WARNING these config files were hacked from scavenging the internet. Therefore I can’t be sure they are optimized, make any sense, or aren’t the source of the issues I’ll discuss in the end of this post.
All is well with this configuration. I just had to specify the DISPLAY variable before running the mining scripts.
ALAS , the issue with this is that AMD drivers have the urge to take a shit in your /usr/lib directory, moving around graphic libraries, and symlinking their own in weird places.
What this means is both Xorg instances have to run with AMD libraries, which is fine with the Seat1 configuration from above, but totally breaks GLX loading for the Seat0 (the one with a real monitor).
There is some hope though, AMD is nice enough to provide two scripts:
/usr/lib/fglrx/switchlibGL
/usr/lib/fglrx/switchlibglx
which are able to undo and restore the /usr/lib hell. The problem is, I still can’t have both versions of libGL.so and libglx.so for my two Xorg instances.
Renzotech my /usr/lib
I wasn’t sure that the previous two scripts were the only things the huge-ass driver installer was doing.
The bulldozer approach I had was:
Take a LVM snapshot from a fresh Debian/sid, then install AMD’s drivers
Mount the snapshot, and make a quick diff to round up all the burps the AMD installer does in my /: diff -qr / /mnt/snap/
I was now sure that only /usr/lib̀ was impacted by all the fun the proprietary drivers have to offer.
I just had to keep two different directories:
one clean /usr/lib for my Seat0 X, with only Debian libs
one dirty /usr/lib for my Seat1 X, with AMD libs
My system being Debian Sid, it breaks all the time, and keeps having kernel updates and whatnots, so I may have to reinstall the AMD drivers every so often. Moreover, there is no chance in hell I was going to patch the +100Mb installer thing to make it behave in a dedicated /usr/lib tree. So in the end I decided to have two /usr/lib folders :
/usr/lib for Seat1, with AMD libs
/usr/lib-test for Seat0 without those libs
Of course, I want all the updates backported in /usr/lib-test, so after every upgrade, I just run the following script:
What it does is:
Checking your /usr/lib is dirty with proprietary drivers
(optional) Deleting /usr/lib-test
Creating /usr/lib-test as a “hollow” copy of /usr/lib, with only symlinks
Restoring the ̀libGL.so and libglx.so symlinks to link to the Debian ones (as would switchlibGL and ̀switchlibglx do)
WARNING !!!!
The script doesn’t care about 32 bits libs. I’m not running any 32 bit program on the AMD card, so I don’t care about them. When I want to restore them in my “clean” /usr/lib-test (for example, after an update) I just run:
and change the path to that X in the lightdm.conf file (xserver-command directive).
When your input devices play dirty tricks
This is the last issue I had to assess. Don’t remove the lines concerning input devices from the previous xorg.(0|1).conf files. They prevent the Seat1 Xorg from using your mouse and keyboard.
You get VERY weird stuff happenning when you control two Xorg process with the same set of keyboard+mouse, including:
unwanted processes starts from clicking on shortcuts
moving files from your desktop around from bad drag and drops
wrecking your system up, from running your commands in rogue xterms …
Make some supersaturated vapour in your living room
What we want is some substance that can be in this state, reasonably near the conditions of a living room. Almost all of the sources I’ve stumbled upon use ethanol. Cheap and available. Unfortunately, it requires temperatures below a rough -35°C.
Cooling
-35° is pretty cold. DIY-sciencists from the Web often use dry ice, because of its so-called high availability, especially in the month of october. This isn’t true all the time outside the USA. Moreover, when all your dry ice has turned to gas, you lose all the cool.
This site was the first I crawled where they used peltier modules to cool our alcohol. They create a temperature difference (Δ) between the two sides. Keep the ‘hot’ side at a temperature T°C, and it’ll pump juice to try to keep the ‘cold’ side at (T-Δ)°C. Two of them stacked are reported to work fine. They are made in china and I could buy 4 TEC-12710 for ~20€, and have a convenient size: roughly the bottom of a CPU heatsink.
Air-tight box
Since the cold area is going to be small, supersaturation will happen very close to the cold plate described earlier. Air inside needs to be able to set.
I’ve decided to build my own PVC box, which happened to be a very bad idea, and just glue-gun everything that didn’t need to move to make an air-tight enclosure.
High energy particle source
A radioactive source will do. α and β decays qualify. My source is americium 241
americium-241 salvaged from a smoke detector (search for an ionization chamber smoke detector on ebay). Try to stay away from very cheap models from china that can be wrongly advertised as using a ionization chamber (I’m looking at you SS-168 from dealextreme ). I got mine off a UK based store on ebay for ~15€. It’s a small, cheap and reliable α radiation source. If you’ve watched the beer cup video from earlier, you know some of that kind of particles actually travel our space all the time. They are free, but happen less frequently, always randomly, and usually create fainter clouds.
Power supply and casing
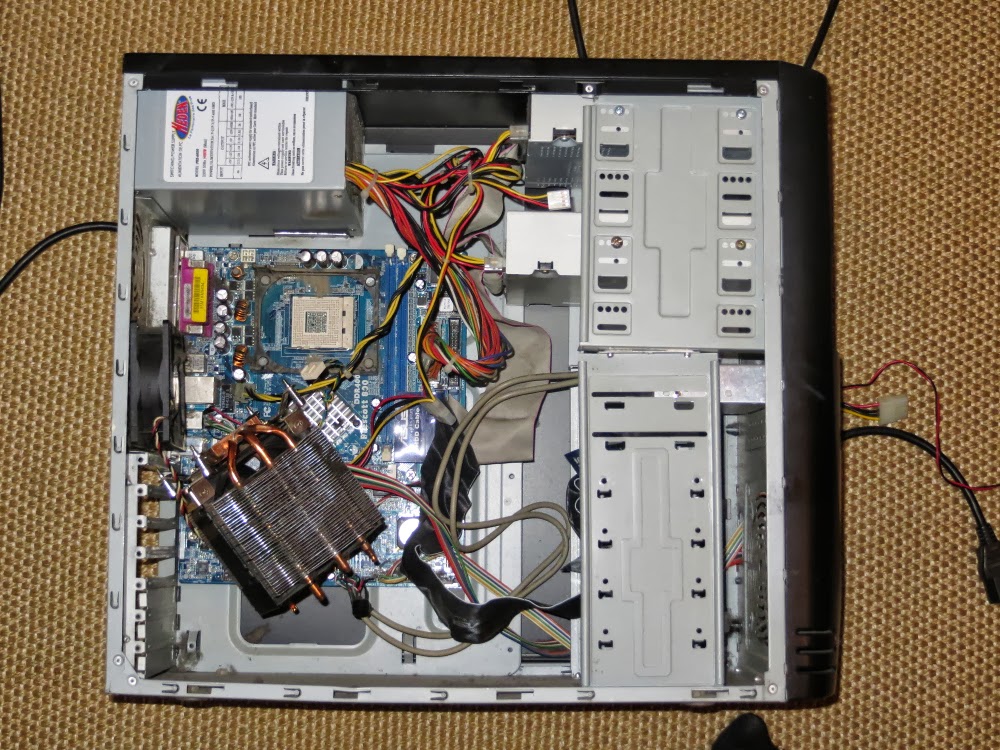
The peltier modules can use as much as 9 amps under 12V, so we need a pretty strong power supply. I’ve already decided to use a CPU heatsink, so let’s just salvage an old ATX case with a cheap supply, and fit everything there.
Proper lighting
The fleeting clouds will be dim. The only way to make them stand out, is to light your box from behind, with a very horizontal stream of light. I use one of these.
Assemble stuff together
The pictures are pretty self-explanatory.
First find an old case (can be found on the pavement)
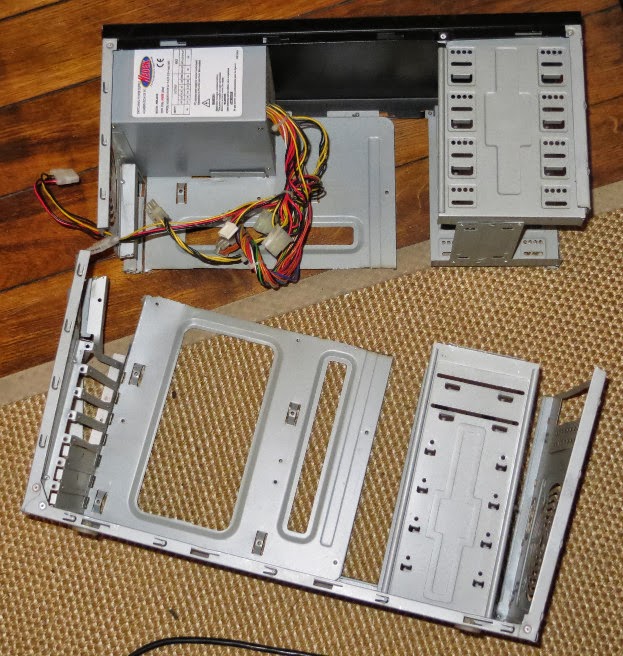
Remove everything we don’t need. This means everything that’s not a PSU, a heatsink. Also get rid of and half the case.
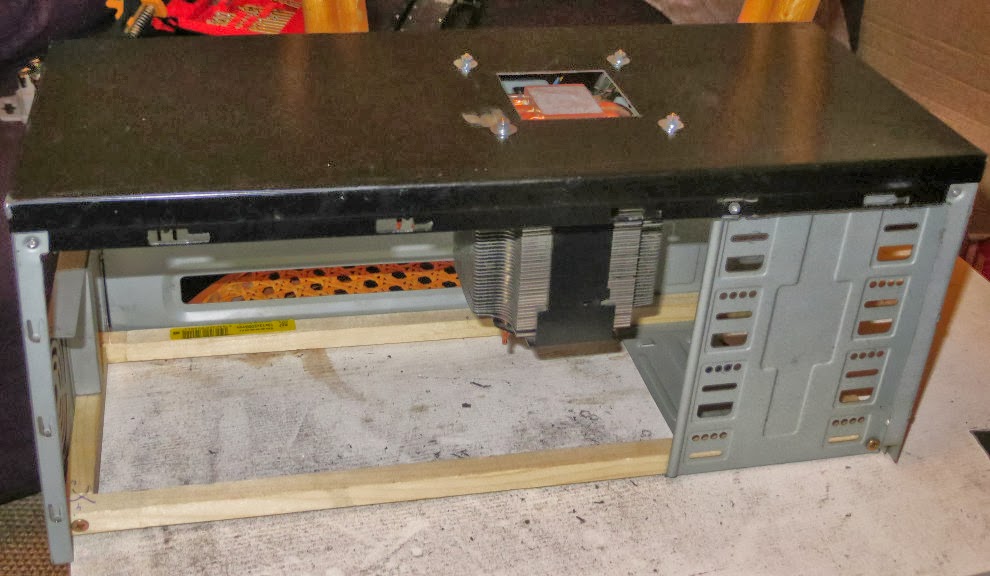
Add some shoring, and screw the heatsink where there’s room
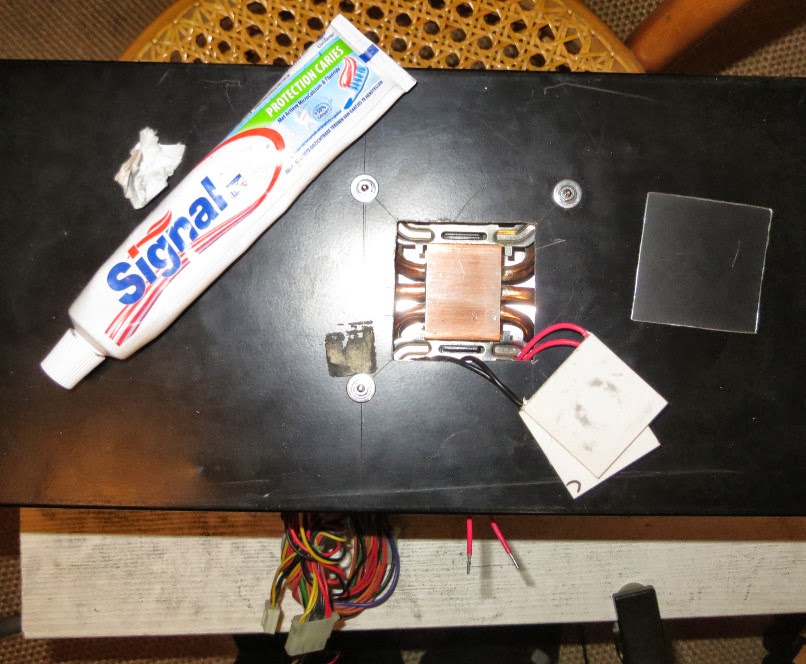
Add the two peltier modules “hot side down”, with some thermal grease between them and the heatsink (toothpaste can work for some first tests, but tends to dry too quickly).
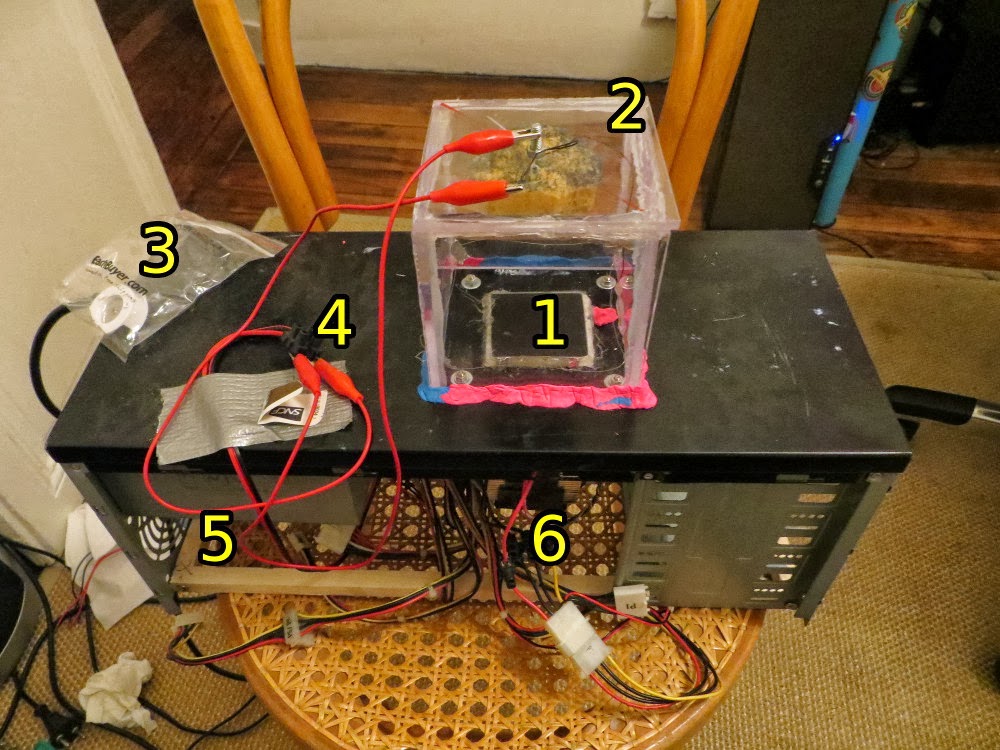
Here is the setup in operating mode.
1 - Cold plate, where stuff happens - 2 - Plexiglas box. With sponge and bolt. - 3 - Radioactive source. Scavenged from a smoke detector - 4 - Some high voltage (here, ~250V) - 5 - PSU - 6 - Peltier modules wires
## Starting it up
Open the box, and pour some alcohol on the sponge. I’ve successfully used 90% alcohol from the drugstore. I usually pour enough so it’ll start to drip. Add your radioactive source if you got one. Alpha particles can’t travel so far through the air, so put it close to the cold plate.
Wire it all up. Top peltier plate should be connected to the 5V rail, and the bottom one to a 12V rail. A quick test showed the 2 modules stack wouldn’t be able to cool down the metal plate enough if both are connected to two 12V rails. I guess it’s because the bottom one can’t transfer the heat from the top one quick enough. Also it’s handy to have them use just one molex plug. Don’t forget to connect the fan of the heatsink.
Applying some strong electric field is optional but recommend). I mean it’s recommended to have live highvoltage wire running around in an alcohol supersaturated environment, that’s all. I’ve used a simple ~400V generator that I hacked into the PSU. I also added a switch. You can also just use any kind of staticly charged thing, like a plastic cup. I have yet to play with different voltages.
Caulk every hole, and wait a few minutes for the gases inside the box to set.
Boot it all up ! The heatsink fan should start, and you should be able to see tiny droplets of alcohol gathering on the top of the plate.
Set your light source so it’s leveled with the cold plate, and illuminating from behind.
Be amazed. Or disappointed.
Future research & TODOs
Check whether vodka is a good replacement for 90% alcohol. (spoiler: it isn’t)
Play with high voltage field inside the box. I’ve noticed that applying some voltage field inside makes the clouds thicker. I could also instanly make a fleeting cloud by approaching a charged plastic ruler near the top bolt.
Get some strong magnets to also have a strong magnetic field for the charged particles to play with.
Use led-strips for a nice lighting from every sides.
Make a smaller transparent box, made of glass to prevent scratches.
Use different sources for ionizing radiation.
Be a little more scientific, as in “more formulas and graphs”
Now how cool does that title sound? Damn cool. The crave for radioactive coolness really started when I watched this video (cloud chamber starts at 9m00s) :
If you’ve never watched any of this channel video, I urge you to go check it and meet Martyn Poliakoff.
A quick search in Youtube for information about cloud chambers will show you how ridiculously easy they are to build.
This one is even using a beer cup, which really began to make my ghetto-tech sense tingling. I had to make one.
How it works
More precisely, how I would explain how it works to someone that won’t just read wikipedia, and who I’m sure that someone won’t be able to point out how wrong I am.
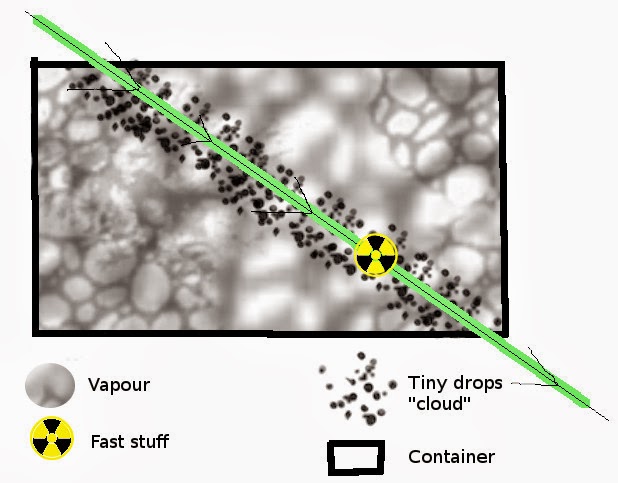
Some vapour is in a state where small perturbation can turn it into liquid (supersaturated ).
Particles (or rays) with enough energy (like, going at at blazing speeds, thousands of km/h) can change the number of electrons on a whole bunch of atoms in the vapor.
That change is enough perturbation, that they leave tiny clouds of condensed vapor in their path.
Tiny cloud disappear, by evaporation and mostly just falling down.
Looks simple. It is quite simple, but a few technical difficulties had to be dealt with. More details of the renzotech to follow in another post.
I have a program (vanilla minecraft server) running in console mode which reads commands from stdin. Unfortunately it doesn’t come with all the nice things you usually want in a shell-like environment : mainly history and tab-completion.
That’s why I was looking for a way to wrap it in some script that would harness the power of libreadline for my own comfort.
I wanted to have something very simple and customizable. This way I can add my own commands and whatnots. If I got to get my hands in it, it better be in Ruby, because that’s the only language I’m efficient in (as in ‘I can write stuff without having to read documentation every two symbols’).
This is important because there is already something in C to do that there. But C requires too much thinking. I want to be able to hit the keyboard with my forehead repeatedly and expect the resulting code to work.
Fortunately this time, Ruby comes with its own libreadline bindings. This website even displays a nice tutorial, but I couldn’t find any simple example on the Web showing me how to use it to wrap another process, and especially display its output without messing up Readline stuff.
This is why I write this post, because I couldn’t understand why no one else before had the same problem as I do, and shared it to the world. I got mad, ranted, ran around waving my arms yelling in despair: “FUCK! I’m gonna have to do some work myself”. Life is so fucking hard.
So here comes the dirty code, half stolen from Joseph Pecoraro’s tutorial :
# Here goes the list of words# you want to be able to use completion on$LIST=['help','kick','ban','pardon','ban-ip','pardon-ip','op','deop','tp','give','tell','stop','save-all','save-off','save-on','list','say','time'].sort$PROMPT="> "# common promptcomp=proc{|s|$LIST.grep(/^#{Regexp.escape(s)}/)}Readline.completion_append_character=" "Readline.completion_proc=comp$stdout.sync=true# $COMMAND will be the command-line program# to wrap and its args$io=IO.popen($COMMAND,"w+")# Reading processThread.new(){whiletruesleep0.1# every time the wrapped# process wants to talk whilea=$io.gets()# save what the user was writingbuf=Readline.line_buffer# clear the current prompt and stuff$stdout.print"\b\b"*(buf.size+$PROMPT.size)# display the wrapped process outputprinta# restore the promptprint("#{$PROMPT}#{buf}")endend}loopdo# Let's summon some readline magicline=Readline::readline($PROMPT)caselinewhen/^\s*$/# We don't store empty lines in the History,# but we still want to send them # to the wrapped process. # Maybe that's something you don't want to do$io.puts(line)elseReadline::HISTORY.push(line)$io.puts(line)endend
This code won’t work with Ruby < 1.9, because Readline.line_buffer doesn’t exist there. For 1.8.x you can use Luis Lavena’s full ruby implementation of readline here.
Also it hasn’t been fully tested, it may not work at all, break everything on your system, dig some obsidian stone and suck you into the Nether or whatever. I won’t be held responsible.